The small box stiffeners at the top of the front inner wings are a strange design. I guess that VW decided that the structure needed stiffening here but they forgot about the effects of mud and gunge from the road gathering inside.
|
|
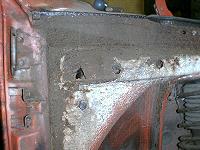
A close-up of the stiffener – apparently only a couple of small holes at the rear end. The other holes are there to let the water and mud in! I could see that there was a lot of very thin steel here which would need to be cut out and replaced. When I started wire-brushing in earnest, I found quite a lot of small holes appearing in the box section and around the front of it and underneath it! I quickly decided it was a write-off! |
|
After removing the box section, I cut out the worst of the thin panel and put in a patch. This all took time to cut back to sound enough metal, to get the patch to fit, to lap or joggle the edges and to weld it into place. |
 |

|
At the forward end of the box, there were more holes and thin metal around the area of the fuel filler, just by the strut housing. |

|

|
At the forward end of the inner wing, the joint between the front valence and the side had gone. There was a previous repair to the outer edge of the box stiffener at the lower edge which also supported the bumper mountings. |

|

|
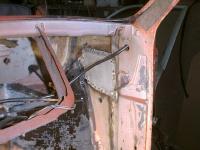
After cutting out the rotten metal, including the previous patch, I cut out a new piece patch and started the job of forming the shape. There are plenty of double curves down here and this made the job of copying them more difficult and time-consuming. On the left, I have formed the main shape but still have to deal with the hole for the indicator wire. On the right, the initial welds go on. |

|

|
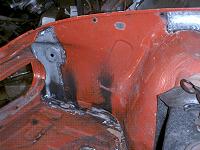
Here, with a new patch to the lower box, the job is complete – and right, the view from the inside. |
|
| After finishing the front, I turned my attention back to the portion over the strut mounting. I’d left this as the rot was in an area of tight double curves which I wasn’t looking forward to! I shaped the patch and then cut out the rotten bit before welding in the new piece. |

|

|
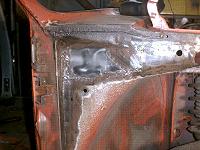
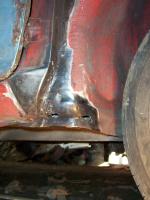
Here is the patch from the outside, I had lapped the edges by joggling them so that the outside would eventually lie flush, needing only a little filler to seal the joint against the weather. |
| Finally, the job is complete with a new box section welded into place. You can also see the fuel tank breather pipe protruding from the box section. |

|
|
Finally, I had to return to the bottom of the door post to deal with the small amount of rust there. After a thorough wire brushing, I found the extent of the holes. Not as bad as the opposite side. |
| After cutting and fitting the plate, I weld it all up and dress the welds. |

|

|
I returned here after a gap of four years (how time flies) and started rubbing down ready for painting. I found a new small hole just in front of the stiffener on the offside but not as extensive as on the nearside. |
| Finally patched and treated with two coats of light blue Hammerite. |

|