Front Left Side Inner Wing
When I started to attack the left side box stiffener, I found that my chisel was cutting through very easily – too easily! When I eventually stripped the stiffener off, I found that a previous repairer had welded a pukka new stiffener over the old rotten one! I was staggered at the stupidity of this – the old one had continued to rot away underneath and the welds attaching the new one to it had lost their strength. It was now only held on by the thick coat of paint! I would have to strip out all the old patching and start again.
|
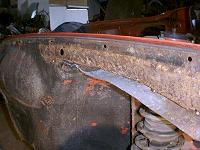
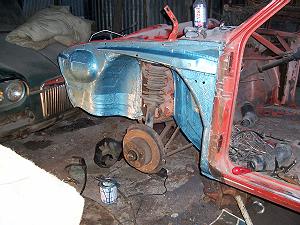
A view of the original stiffener after the new one had been stripped off, revealing plenty of rust beneath! On the right is the rear portion, the forward end is shown below.
|

|
|
The extraneous piece of metal sticking out below the stiffener is covering more rot and is part of the earlier unhelpful workmanship. I reckoned I would have to strip this out too.
|
|
The remains of the old box stiffener laying on the ground after being stripped from the car and looking very sorry for itself.
|

|
|
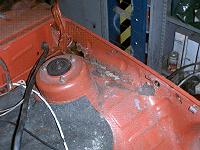
Inside the luggage compartment, another line of rot can be seen running by the strut housing, hidden from the outside by the cover strip.
|
|
Here is the inside of the car, there is a lot of visible daylight through the side of the car. This is where the fuse box is located, so it is normally extra hard to get at and extra important to make sure it doesn’t leak in use!
|

|

|
After cutting out the rot, I am left with a decent sized hole to fit a patch into.
|
|
And here it is welded in. Now for the rest of the holes . . .
|

|

|
I found after digging around that the old patch could be trimmed and re-attached.
|
|
The finished patching seen from the inside.
|

|

|
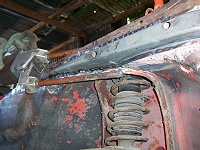
I’m almost ready to attach the new rib section – here it is offered up to check for fit. The original genuine VW parts label is visible here!
|
|
The indespensible long reach spot welder was used all the way round to attach the new rib.
|
|

|
The completed job! I shall take especial care to make sure that the inside of this rib is well protected when the painting is done – I don’t want to have to do this job again if I can help it!
|
|
And there’s more trouble at the bottom of the door pillar! There is a small hole here which will need dealing with.
|

|

|
After cleaning up I cut and fitted a patch. This was curved in two dimensions, here it is being offered up to check for fit.
|
|
And the job finished – I could reach along the bottom seam and most of the top half with the spot welder but I had to finish the front edges with the mig.
|

|
|
I returned here after a gap of four years (how time flies) and started rubbing down ready for painting. Then I found a new patch of rust. This had gone from the inside and is another weak point on the car.
No choice but to cut it out ...
|
|
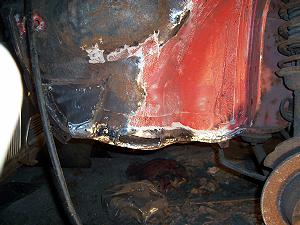
... and weld in a patch ...
|

|
|
... before treating the whole area to two coats of light blue Hammerite. I will need to come back to drop the suspension to paint behind it.
|
Return to Inner Wings index